Saturday, March 12, 2011
Post cards and side trips
I went to an art meetup this week and started this one but now I am on a roll and want to make a bunch more. The chip board is recycled from packaging and I have a giant stack of it. These will all be covered in clear packing tape when they are ready to go in the mail. I added a bit more glitter to this and dash of color on the left so your eye would travel across the post card. You can also cover them in semi gloss or matte medium but I think that gets expensive if you are making many of them. Enjoy.
Thursday, February 24, 2011
Pressed flowers
I grew up in a house with dried flowers and I taught myself different methods to press flowers when I was an adult. I don't pick flowers but it is easy enough to find great looking flower heads on the ground in San Diego. Once this was pressed I sealed it to the page with a bit of liquid gloss medium.
The trick is to press the flowers right away so they retain their color. If you are in a hurry you can use the oven on the lowest setting. I plan on pressing some of the lovely clover that is popping up all over the city. With all the rain they are triple the size this year. No luck finding a giant 4 leaf clover.
Tuesday, February 22, 2011
Journal bits
I had a scrap piece of fabric that I ran though the printer for another project and didn't want to throw the piece out so I dyed it with watercolors. I only used one color but varied the way I applied it and created a nice ombre effect. I have used a few hearts but I am still waiting for the right page to use them on. I tend to stick all these little bits down in my purse and they get mixed up with my rings.
Monday, February 21, 2011
To the country
It always rains this week in February so you would think that I would be use it by now but no I forget about it every year. We were lucky today because the rains started at 6:30 am and petered out by 10:00am. We drove about 25 miles north of San Diego to check out the house a friend is buying. Hopefully all goes well with the final inspection and she'll be able to move in soon. It's a great house and she's lucky have a view of a pasture that will hopefully stay clear for a few years.
Down the street a bit we stopped at a Farmers market and picked up a few goodies and saw the vast fields of the San Diego Ostrich farm.

Down the street a bit we stopped at a Farmers market and picked up a few goodies and saw the vast fields of the San Diego Ostrich farm.
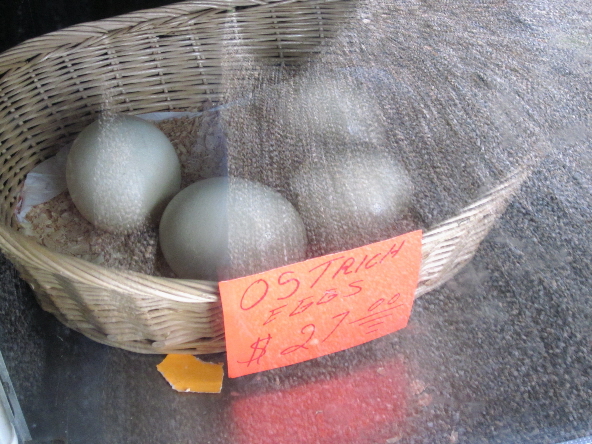
In case you are wondering they feel like regular eggs.
Sunday, February 20, 2011
Blueberries and the closest I will get to organic gardening.
Step 1 Buy blueberries and stare at them. Then draw simple circles. I used the middle out of a CD but you could draw them freehand or with a compass.
Step 2. Choose at least 3 colors to work with because if gives your pictures more dept. Build color light to dark. Once the first color is laid down erase the hard outside lines to get the 3-D effect. Build color. For me it's easier to fill when I work in a circular motion.
Step 4 Fill in the negative space to help your drawing pop. Add color lightly until you get the desired effect.
Step 2. Choose at least 3 colors to work with because if gives your pictures more dept. Build color light to dark. Once the first color is laid down erase the hard outside lines to get the 3-D effect. Build color. For me it's easier to fill when I work in a circular motion.
Step 4 Fill in the negative space to help your drawing pop. Add color lightly until you get the desired effect.
I love all the new posters popping up that emphasise fresh food so I did my own take on this theme. I wanted to pick something a little different for the title and went with It's Alive a nod to Frankenstein.
A few years ago I went in to weed a garden and learned that I am allergic to it. I could do it if I kept my sleeves down and gloves on but I am addicted to rolling up my sleeves. I'm not sure what I'm allergic to but I have to stick to container gardening if I ever what to make it as a farmer.
Friday, February 18, 2011
lockets and knick knacks
The spine of my latest journal. I worked on most of the pages first and then bound the book. I loved working like this because I could change the order of the pages. I found I could tell different stories depending on the order. Everything in the book is true but the pages aren't created in liner order. Which is how my brain works so it only seems fitting.
The book is made from scraps of fabric and art paper that I already had in my stash. My friend gave me a bunch of random scraps and I figured out I could sew them together and use them for spines. I used duct tape underneath to keep the fabric stiff which I'm not sure I would do again. It is cheaper than linen tape but it has a self healing quality to it so it's a bit hard to sew though. You really have to punch a hole in the fabric and I have a lazy way of bookbinding. I usually poke the holes in the spine as I go not in the beginning.
Giant button and locket from my art stash. The left side of the locket says the heart sees (1/2 a quote from a yogi brand tea bag) and the right is a water colored heart with an eye drawn on it. I used Elmer's glue on both side and made a little bath of glue and let it dry for a few hours.
The book is made from scraps of fabric and art paper that I already had in my stash. My friend gave me a bunch of random scraps and I figured out I could sew them together and use them for spines. I used duct tape underneath to keep the fabric stiff which I'm not sure I would do again. It is cheaper than linen tape but it has a self healing quality to it so it's a bit hard to sew though. You really have to punch a hole in the fabric and I have a lazy way of bookbinding. I usually poke the holes in the spine as I go not in the beginning.
Giant button and locket from my art stash. The left side of the locket says the heart sees (1/2 a quote from a yogi brand tea bag) and the right is a water colored heart with an eye drawn on it. I used Elmer's glue on both side and made a little bath of glue and let it dry for a few hours.
Wednesday, February 16, 2011
Paper Milagros
My friend has a book on Milagros and I did a little bit of reading on the meaning of the symbols and decided to make my own altar in my journal. First I cut out the shapes and then played around with the layout on this bench. I wanted to do something Spring oriented and i keep seeing giant patches of clover so I added the 4 clover design which looks a little bit like a clover/iris mix.
The second step was painting each piece with twinkling H2O watercolors. I love being able to buy individual colors. I have a traditional set of watercolors but I don't use it much. If you get these write the name of the color on the bottom with permanent marker. They are each labeled but when you get them wet the name rubs off after awhile and it will be hard to replace. I love getting the hobby set of brushes that come 4 or 5 to a pack. Never get the white horse hair looking brushes because the bristles fall out and you just have to throw them away. These were nice because they have a little grip and they were under $10. I also paint pieces of paper first and cut the shapes out second but this project was a learn as you go experience.

The background is tape and I have mixed feelings about using it. I love tape washi tape but it's really for decoration. I prefer to use artist tape because it stays and doesn't lose it's stick. I don't know if masking tape is made any differently than it was 15 years ago but it does disintegrate over time and leaves ghost marks on the page. I could always redo the background with paint in the future.
The second step was painting each piece with twinkling H2O watercolors. I love being able to buy individual colors. I have a traditional set of watercolors but I don't use it much. If you get these write the name of the color on the bottom with permanent marker. They are each labeled but when you get them wet the name rubs off after awhile and it will be hard to replace. I love getting the hobby set of brushes that come 4 or 5 to a pack. Never get the white horse hair looking brushes because the bristles fall out and you just have to throw them away. These were nice because they have a little grip and they were under $10. I also paint pieces of paper first and cut the shapes out second but this project was a learn as you go experience.
The third step was to layer and glue the pieces. I have Elmer's glue all with me at all times. I like glue sticks but anything I glued a few years ago can easily be pulled apart which is a good and a bad trait. I also like book binders acid free glue but Elmer's washes out of your clothes and I now have quite a few pants with random rough patches. I don't have art clothes and I forget to wear my apron often. I used the Faber-Caster Pitt artist pen to add a bit of the hand hammered effect on the Milagros. This is pen number 273. I'm always looking for pens that look like pencil lead.
The background is tape and I have mixed feelings about using it. I love tape washi tape but it's really for decoration. I prefer to use artist tape because it stays and doesn't lose it's stick. I don't know if masking tape is made any differently than it was 15 years ago but it does disintegrate over time and leaves ghost marks on the page. I could always redo the background with paint in the future.
Subscribe to:
Posts (Atom)